In meinem ersten Beitrag Collabora Online Office mit Docker in Plesk bereitstellen und an Nextcloud anbinden, habe ich Euch gezeigt, wie man Collabora Online Office in Plesk bereitstellt. Jetzt wollen wir das ganze ohne Plesk und auf dem gleichen VPS bereitstellen, auf dem auch unsere Nextcloud läuft.
Als erstes müssen wir Docker installieren:
sudo apt-get install docker.io
und den entsprechenden Docker Container starten:
docker run -t -d -p 127.0.0.1:9980:9980 -e 'domain=nextcloud\\.deine-domain\\.tld' -e 'username=Benutzername' -e 'password=Dein-Passwort' --restart always --cap-add MKNOD collabora/code
Wenn Ihr von mehreren Nextcloud-Instanzen auf den Docker-Container zugreifen wollt, müsst Ihr einfach die FQDNs mit einer Pipe trennen:
'domain=host1\\.deine-domain\\.tld|host2\\.deine-domain\\.tld'
Danach aktivieren wir einige Module im Apache2, um ihn als Reverse Proxy zu verwenden:
sudo a2enmod proxy
sudo a2enmod proxy_wstunnel
sudo a2enmod proxy_https
sudo a2enmod proxy_http
sudo a2enmod ssl
jetzt legen wir den vhost an:
sudo nano /etc/apache2/sites-available/002-office.deine-domain.tld.conf
Inhalt (bitte enstprechend Eurer Domain anpassen):
<VirtualHost *:80>
        # The ServerName directive sets the request scheme, hostname and port that
        # the server uses to identify itself. This is used when creating
        # redirection URLs. In the context of virtual hosts, the ServerName
        # specifies what hostname must appear in the request's Host: header to
        # match this virtual host. For the default virtual host (this file) this
        # value is not decisive as it is used as a last resort host regardless.
        # However, you must set it for any further virtual host explicitly.
        ServerName office.deine-Domain.tld

        ServerAdmin webmaster@deine-Domain.tld
        DocumentRoot /var/www/html

        # Available loglevels: trace8, ..., trace1, debug, info, notice, warn,
        # error, crit, alert, emerg.
        # It is also possible to configure the loglevel for particular
        # modules, e.g.
        #LogLevel info ssl:warn

        ErrorLog ${APACHE_LOG_DIR}/error.log
        CustomLog ${APACHE_LOG_DIR}/access.log combined

        # For most configuration files from conf-available/, which are
        # enabled or disabled at a global level, it is possible to
        # include a line for only one particular virtual host. For example the
        # following line enables the CGI configuration for this host only
        # after it has been globally disabled with "a2disconf".
        #Include conf-available/serve-cgi-bin.conf
</VirtualHost>
und die Site aktivieren:
sudo a2ensite 002-office.deine-domain.tld.conf
Den vhost sichern wir wieder mit einem SSL-Zertifikat von LetsEncrypt ab:
sudo certbot --authenticator standalone --installer apache -d office.deine-domain.tld --pre-hook "service apache2 stop" --post-hook "service apache2 start"
dieses mal wieder die Option 2 (redirect) wählen, aber bevor wir den Indianer neu starten bearbeiten wir die soeben angelegte conf:
sudo nano /etc/apache2/sites-available/002-office.deine-domain.tld-le-ssl.conf
<VirtualHost *:443>
ServerName office.deine-domain.tld:443

# SSL configuration, you may want to take the easy route instead and use Lets Encrypt!
SSLEngine on
SSLCertificateFile /etc/letsencrypt/live/office.deine-domain.tld/fullchain.pem
SSLCertificateKeyFile /etc/letsencrypt/live/office.deine-domain.tld/privkey.pem
SSLProtocol             all -SSLv2 -SSLv3
SSLCipherSuite ECDHE-ECDSA-CHACHA20-POLY1305:ECDHE-RSA-CHACHA20-POLY1305:ECDHE-ECDSA-AES128-GCM-SHA256:ECDHE-RSA-AES128-GCM-SHA256:ECDHE-ECDSA-AES256-GCM-SHA384:ECDHE-RSA-AES256-GCM-SHA384:DHE-RSA-AES128-GCM-SHA256:DHE-RSA-AES256-GCM-SH$
SSLHonorCipherOrder     on

# Encoded slashes need to be allowed
AllowEncodedSlashes NoDecode

# Container uses a unique non-signed certificate
SSLProxyEngine On
SSLProxyVerify None
SSLProxyCheckPeerCN Off
SSLProxyCheckPeerName Off

# keep the host
ProxyPreserveHost On

# static html, js, images, etc. served from loolwsd
# loleaflet is the client part of LibreOffice Online
ProxyPass           /loleaflet https://127.0.0.1:9980/loleaflet retry=0
ProxyPassReverse    /loleaflet https://127.0.0.1:9980/loleaflet

# WOPI discovery URL
ProxyPass           /hosting/discovery https://127.0.0.1:9980/hosting/discovery retry=0
ProxyPassReverse    /hosting/discovery https://127.0.0.1:9980/hosting/discovery

# Main websocket
ProxyPassMatch "/lool/(.*)/ws$" wss://127.0.0.1:9980/lool/$1/ws nocanon

# Admin Console websocket
ProxyPass   /lool/adminws wss://127.0.0.1:9980/lool/adminws

# Download as, Fullscreen presentation and Image upload operations
ProxyPass           /lool https://127.0.0.1:9980/lool
ProxyPassReverse    /lool https://127.0.0.1:9980/lool
<VirtualHost>
jetzt können wir den Webserver neustarten:
sudo service apache2 restart
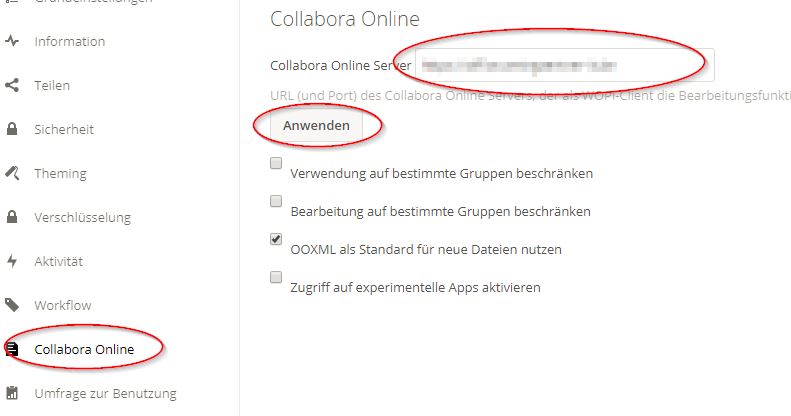
In Nextcloud unter Einstellungen für Collabora Online die URL eintragen
Wenn gespeichert, können wir Dokumente direkt im Browser bearbeiten:

Unter der folgenden URL findest Du die Admin-Konsole von Collabora:
https://office.deine-domain.tld/loleaflet/dist/admin/admin.html
Dort kannst Du ein paar Einstellungen anpassen.
Gutes Gelingen 😉 und bei Fragen wie immer fragen…