
If you already have one (or two) VPS, why shouldn’t you become a global timekeeper? If you do not have a VPS you can get one here @netcup with 5€ Discount or start at Hetzner Cloud with 20€ start credits.
But now I’ll show you how we configure our VPS to make the time available for other computers around the world.
Requirements that we should meet:
– a static public IP address
– a permanent and stable internet connection
If we decide to provide the time in the NTP pool, we should be aware that this is not a short-term decision and that we configure our VPS for this in the longer term.
Also note the information under http://www.pool.ntp.org and read them carefully.
If you are sure to join the pool, we will first bring our VPS up to date:
sudo apt-get -y update && apt-get -y upgrade && apt-get -y dist-upgrade
Then we install NTP:
sudo apt-get install ntp
If we have a firewall, we must of course remember to open port 123 UDP incoming. As example with ufw:
sudo ufw allow 123/udp
We should specify at least four and a maximum of seven time servers in our ntp.conf as a source.
We look for two Timeservers in the List of Stratum 1 Server. It is important that we only use servers that are categorized as „OpenAccess“ under „AccessPolicy“

Once we have picked out two Stratum 1 time servers, we call the List of Stratum 2 Server and look for two of this kind. Again, pay attention to „OpenAccess“.
Now we have made a note of the servers and adjust the ntp.conf so that we can also get the time from these servers.
sudo cp /etc/ntp.conf /tmp/ntp.conf.bak
sudo nano /etc/ntp.conf
Content should look like this
# /etc/ntp.conf, configuration for ntpd; see ntp.conf(5) for help

driftfile /var/lib/ntp/ntp.drift

# Enable this if you want statistics to be logged.
#statsdir /var/log/ntpstats/

statistics loopstats peerstats clockstats
filegen loopstats file loopstats type day enable
filegen peerstats file peerstats type day enable
filegen clockstats file clockstats type day enable

# Specify one or more NTP servers.
server zeit.domain1.tld      iburst
server zeit.domain2.tld      iburst
server zeit.domain3.tld      iburst
server zeit.domain4.tld      iburst

# By default, exchange time with everybody, but don't allow configuration.
restrict -4 default kod notrap nomodify nopeer noquery limited
restrict -6 default kod notrap nomodify nopeer noquery limited

# Local users may interrogate the ntp server more closely.
restrict 127.0.0.1
restrict ::1

# Needed for adding pool entries
restrict source notrap nomodify noquery
everything else can be deleted. If something does not work, we can use the saved configuration with
sudo cp /tmp/ntp.conf.bak /etc/ntp.conf
Once we have adjusted the configuration, we restart the NTP service:
sudo systemctl restart ntp.service
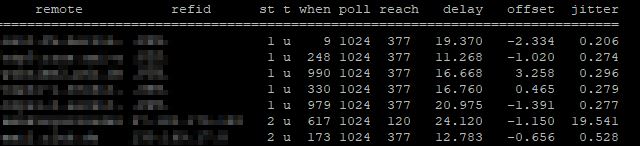
After a while we will check the status of our time server with the following command:
ntpq -p
The output should look something like this:
From this step on, we first check from another host whether we can get the time from our time server:
ntpdate -q hostname.deine-domain.tld
Output:

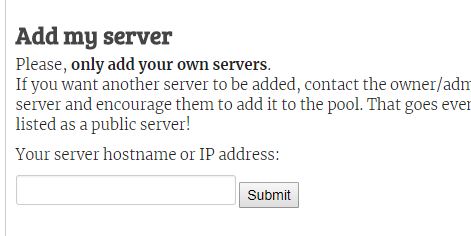
If everything works the way we want, then we can register our server with its IP address and make it available to others. To do this, we have to register with NTP Pool and add the server after confirmation:
Once we have added the server, we just look the next day under Manage Server to see the status of the server. Only servers with a score above 10 are included in the pool; this should generally be the case after approx. 24 hours.
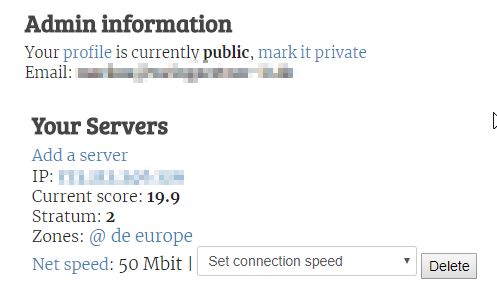
If there are problems with the server later, we are automatically notified by the pool and can react to them.
If you have any questions or suggestions for improvement, please let me know … 🙂