Today, we configure our Nextcloud to automatically scan files for viruses. To do this, we need to install ClamAV and configure the antivirus app.
Step 1: First install ClamAV
sudo apt install clamav clamav-freshclam clamav-daemon
and start the ClamAV update process:
sudo systemctl stop clamav-freshclam
sudo freshclam
Then we edit the ClamAV configuration
sudo nano /etc/clamav/clamd.conf
and adjust the following values to fit our installation:
MaxDirectoryRecursion 30
MaxFileSize 100M
PCREMaxFileSize 100M
StreamMaxLength 100M
now we restart ClamAv and freshclam
sudo systemctl restart clamav-freshclam
sudo systemctl restart clamav-daemon
freshclam checks every hour to see if there are any updates for ClamAV.
Step 2: Install Antivirus-App in Nextcloud
We switch to the Nextcloud directory and the apps folder in there:
cd /var/www/html/nextcloud/apps
and download the antivirus app, unpack it and set the rights for Apache:
sudo wget https://github.com/nextcloud/files_antivirus/archive/master.zip
sudo unzip master.zip
sudo mv files_antivirus-master files_antivirus
sudo rm master.zip
sudo chown -R www-data:www-data /var/www/html/nextcloud/apps/files_antivirus
Now we activate the antivirus app in the settings of Nextcloud:

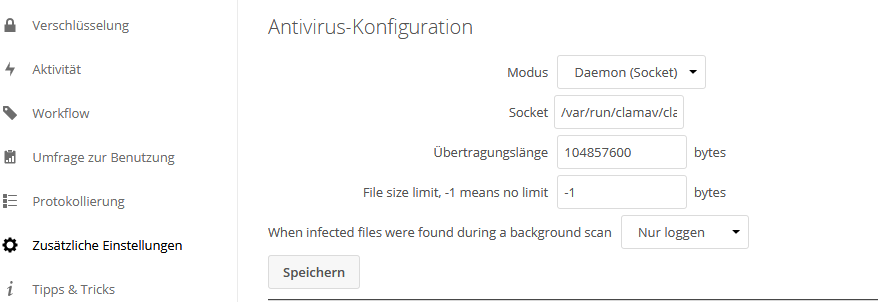
and go to the additional settings to change the values for scanning:
We set the mode to „Daemon (Socket)“
Transmission length to „104857600“
and the last settings to „Log only“ or „Delete file“, as we favor it:

Now we have made our Nextcloud even safer. 🙂
That’s it and have fun…
