
Picture from Alexandra_Koch on Pixabay
Changes 18.11.2020:
– Adjust server.conf because typo has changed
– Adjust signaling.service and janus.service because they does not start after reboot
Changes 22.11.2020:
– Adjust janus.jcfg
– change repositoty of janus
Since Nextcloud has released the High Performance Backend as OpenSource under AGPL License, i tried my luck to install it on Ubuntu.
Now I want to share how to do it.
Requirements:
– a VPS with Ubuntu 18.04 or 20.04 LTS minimal Image installed (you can get one here @netcup with 5€ Discount or start at Hetzner Cloud with 20€ start credits)
– shell access and appropriate rights
– One DNS A and possibly AAAA record for our nginx vhost and stun/turn-server (I use signaling.example.com for all three services in this guide)
– Optional – a second DNS A and possibly AAAA record for stun/turnserver
Hardware Requirements:
4 CPU
8 GB RAM
32 GB Disk-Space
See also: Nextcloud Portal
You can also test a smaller server if you don’t have that many users
Step 1: Install Firewall and other packages
First of all, you should install a firewall to secure your VPS (if not installed) and allow incoming traffic to port 80/443 and 22 (ssh) only. For Securing ssh-access you can use fail2ban and passwordless authentication. Many guides for this are out there.
apt install ufw -y
ufw allow http
ufw allow https
ufw allow ssh
ufw allow 5349/tcp
ufw allow 5349/udp
ufw enable
Accept with „y“
Step 2: Install and config stun/turnserver
you have to install the package coturn:
apt install coturn
enable daemonizing for your turnserver:
sed -i '/TURNSERVER_ENABLED/c\TURNSERVER_ENABLED=1' /etc/default/coturn
create a random hex key for your nextcloud talk app and signaling server with:
openssl rand -hex 32
and copy it for later use, then edit /etc/turnserver.conf:
mv /etc/turnserver.conf /etc/turnserver.conf.bak && nano /etc/turnserver.conf
copy, paste and adjust the following code:
listening-port=5349
fingerprint
lt-cred-mech
use-auth-secret
static-auth-secret=output_of_openssl rand -hex 32
realm=signaling.example.com
total-quota=100
bps-capacity=0
stale-nonce
no-loopback-peers
no-multicast-peers
and last, restart and enable coturn:
systemctl restart coturn && systemctl enable coturn
Step 3: Install and config janus
You have to add janus Repository of morph027
Ubuntu 18.04 and 20.04
add repo key:
curl -sL -o /etc/apt/trusted.gpg.d/morph027-janus.asc https://packaging.gitlab.io/janus/gpg.key
add repo:
. /etc/lsb-release; echo "deb [arch=amd64] https://packaging.gitlab.io/janus/$DISTRIB_CODENAME $DISTRIB_CODENAME main" | tee /etc/apt/sources.list.d/morph027-janus.list
apt update
apt install janus
Now generate a random api key for turnserver:
openssl rand -base64 16
and copy the output for later use.
Edit /etc/janus/janus.jcfg
nano /etc/janus/janus.jcfg
go to section nat and enter your stunserver and port, uncomment full_trickle = true, turn_server with port and type and the generated api key:
you can copy, paste and adjust the following:
stun_server = "127.0.0.1"
stun_port = 5349
full_trickle = true
turn_server = "127.0.0.1"
turn_port = 5349
turn_type = "udp"
turn_rest_api_key = "openssl rand -base64 16"
then comment the following lines:
certificates: {
# cert_pem = „/etc/ssl/certs/ssl-cert-snakeoil.pem“
# cert_key = „/etc/ssl/private/ssl-cert-snakeoil.key“
#cert_pwd = „secretpassphrase“
}
adjust janus.service, so that it will start after coturn.service:
nano /lib/systemd/system/janus.service
adjust under Unit-Section:
[Unit]
Description=Janus WebRTC gateway
After=coturn.service
Documentation=https://janus.conf.meetecho.com/docs/index.html
save, enable and restart janus:
systemctl daemon-reload && systemctl restart janus && systemctl enable janus
Step 4: Running or Install NATS Server
If your VPS support docker, then you can use docker to run NATS Server:
Install docker if not installed:
curl -sSL https://get.docker.com/ | CHANNEL=stable sh
systemctl enable docker.service
systemctl start docker.service
then run NATS Server:
docker run --restart=always --name=NATSSERVER -d -p 4222:4222 -ti --restart=always nats:latest
when you want to run NATS Server without docker, there is another Repository of morph27.
you have to add its key and its repo:
curl -sL -o /etc/apt/trusted.gpg.d/morph027-nats-server.asc https://packaging.gitlab.io/nats-server/gpg.key
echo "deb [arch=amd64] https://packaging.gitlab.io/nats-server nats main" | tee /etc/apt/sources.list.d/morph027-nats-server.list
install NATS Server:
apt update
apt install nats-server
generate config under /etc/nats/nats.conf
install -d -o nats -g nats /etc/nats
sudo -u nats echo "listen: 127.0.0.1:4222" > /etc/nats/nats.conf
start and enable NATS-Server:
systemctl start nats-server && systemctl enable nats-server
Step 5: Install nextcloud-spreed-signaling Server
now we can install the nextcloud-spreed-signaling server, first of all, we have to install the packages we need to built:
apt install git automake golang build-essential python3 -y
then we clone the git repository and start the build process:
cd /opt
git clone https://github.com/strukturag/nextcloud-spreed-signaling.git
cd nextcloud-spreed-signaling/
make build
then copy the binary to /usr/bin
cp bin/signaling /usr/bin/
now create a dedicated user:
useradd --system --shell /usr/sbin/nologin --comment "Standalone signaling server for Nextcloud Talk." signaling
create the server.conf in /etc/signaling/
mkdir /etc/signaling/
touch /etc/signaling/server.conf
chown signaling: /etc/signaling/server.conf
chmod 600 /etc/signaling/server.conf
and copy the systemd file:
cp dist/init/systemd/signaling.service /etc/systemd/system/signaling.service
and adjust, so that signaling.service start after janus.service:
nano /etc/systemd/system/signaling.service
and change under Unit-Section:
[Unit]
Description=Nextcloud Talk signaling server
After=janus.service
save and then:
systemctl daemon-reload
systemctl enable signaling
create keys for config:
Nextcloud Secret Key
openssl rand -hex 16
Block-Key
openssl rand -hex 16
Hash-Key
openssl rand -hex 16
Now we have five keys at all, as example (do not use these keys)
Turn-Key from Step 2: 2309a206fc4de0f511ce9da52c088171f69193d1f701323d5ab4f733c9853445
api-key from Step 3: Z6ZkKhjwCFa6RMpFU854Fw==
Nextcloud-Secret-Key: 692cdc99256135bcb7849ca1886e2ed6
Block-Key: f702adbf248ab0e752fa76cb46bcba12
Hash-Key: db61d5a8c6bd2b47a3cb0abce3545040
open /etc/signaling/server.conf with your editor
nano /etc/signaling/server.conf
then copy, paste and adjust (change keys to yours) the following config
[http]
listen = 127.0.0.1:8080
[app]
debug = false

[sessions]
hashkey = db61d5a8c6bd2b47a3cb0abce3545040
blockkey = f702adbf248ab0e752fa76cb46bcba12

[backend]
backends = backend-1 #here you can add more backends commaseparated backend-1, backend-2, backend-3
allowall = false
timeout = 10
connectionsperhost = 8

[backend-1]
url = https://nextcloud.example.com
secret = 692cdc99256135bcb7849ca1886e2ed6

#[backend-2]
#url = https://nextcloud2.example.com
#secret = openssl rand -hex 16

#[backend-3]
#url = https://nextcloud3.example.com
#secret = openssl rand -hex 16


[nats]
url = nats://localhost:4222

[mcu]
type = janus
url = ws://127.0.0.1:8188

[turn]
apikey = Z6ZkKhjwCFa6RMpFU854Fw==
secret = 2309a206fc4de0f511ce9da52c088171f69193d1f701323d5ab4f733c9853445
servers = turn:signaling.example.com:5349?transport=udp,turn:signaling.example.com:5349?transport=tcp
then start signaling:
systemctl start signaling
and check status of the service:
systemctl status signaling
and if it listens on port 8080:
netstat -tulpen | grep 8080
go to next step.
Step 6: Install nginx and create vHost for signaling server
Now we will install nginx as reverse proxy for our high performance backend:
apt install nginx python3-certbot-nginx -y
and create the vHost:
nano /etc/nginx/sites-available/signaling
copy, paste and adjust:
server {
    listen :80;
    listen [::]:80;
    server_name signaling.example.com;
    }
and activate vhost:
ln -s /etc/nginx/sites-available/signaling /etc/nginx/sites-enabled/signaling
then check with:
nginx -t
and reload
systemctl reload nginx
now use certbot to obtain a certificate:
certbot --authenticator standalone --installer nginx -d signaling.example.com --pre-hook "service nginx stop" --post-hook "service nginx start"
then paste the following config in the vHost-conf:
mv /etc/nginx/sites-available/signaling /tmp/signaling.bak && nano /etc/nginx/sites-available/signaling
upstream signaling {
    server 127.0.0.1:8080;
}

server {
    server_name signaling.example.com;

    listen :443 ssl http2; # managed by Certbot
    listen [::]:443 ssl http2;
    ssl_certificate /etc/letsencrypt/live/signaling.example.com/fullchain.pem; # managed by Certbot
    ssl_certificate_key /etc/letsencrypt/live/signaling.example.com/privkey.pem; # managed by Certbot
    include /etc/letsencrypt/options-ssl-nginx.conf; # managed by Certbot
    ssl_dhparam /etc/letsencrypt/ssl-dhparams.pem; # managed by Certbot
    add_header Strict-Transport-Security "max-age=63072000; includeSubdomains; preload";

location /standalone-signaling/ {
        proxy_pass http://signaling/;
        proxy_http_version 1.1;
        proxy_set_header Host $host;
        proxy_set_header X-Real-IP $remote_addr;
        proxy_set_header X-Forwarded-For $proxy_add_x_forwarded_for;
    }

    location /standalone-signaling/spreed {
        proxy_pass http://signaling/spreed;
        proxy_http_version 1.1;
        proxy_set_header Upgrade $http_upgrade;
        proxy_set_header Connection "Upgrade";
        proxy_set_header Host $host;
        proxy_set_header X-Real-IP $remote_addr;
        proxy_set_header X-Forwarded-For $proxy_add_x_forwarded_for;
    }

}
server {
    if ($host = signaling.example.com) {
        return 301 https://$host$request_uri;
    } # managed by Certbot


    listen :80;
    listen [::]:80;
    server_name signaling.example.com;
    return 404; # managed by Certbot


}
and check an reload nginx:
nginx -t
if ok
systemctl reload nginx
Step 7: Configure nextcloud to use stun/turn and signaling server
Now we are ready to add turn/stun- and signaling-server to our Nextcloud
Go to Settings, Talk and enter the following:
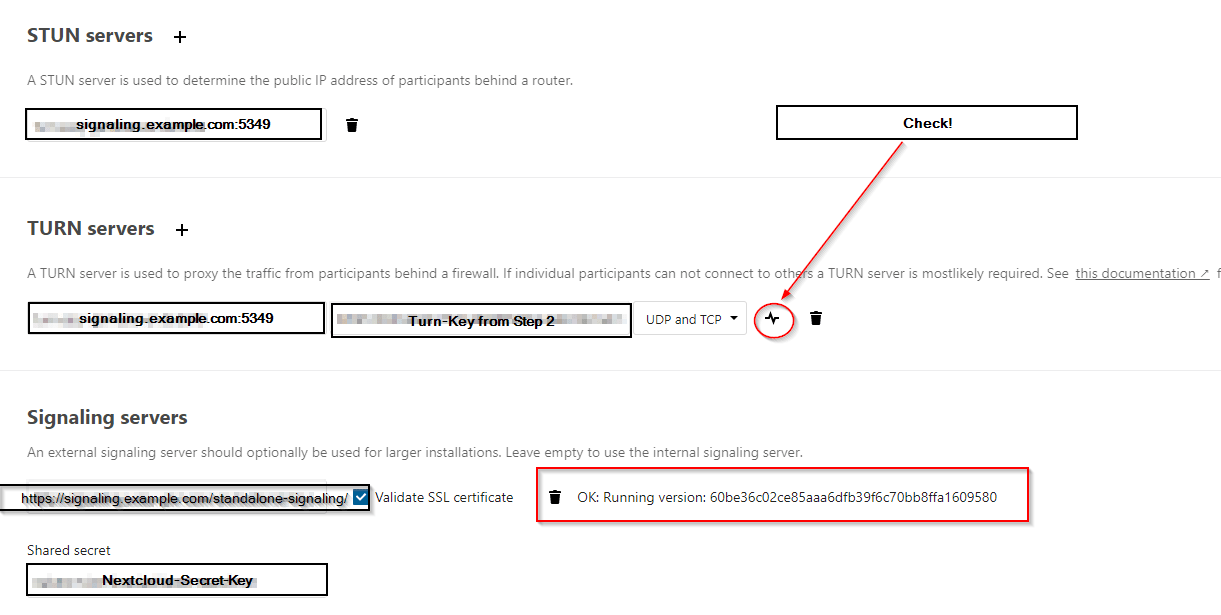
And then enjoy your High Performance Backend.
Problems with the tutorial? Then comment below or contact me per Mail or Mastodon.
If you want a managed nextcloud, then look here.
I will be happy if you would support my work here.
Happy nextclouding and do not forget to share ?
Sources:
Morph27
Struktur AG
Picture from Alexandra_Koch on Pixabay
This Guide was tested on:
netcup
Hetzner Cloud