
What is Mastodon?
Mastodon is a microblogging platform akin to others you may have seen, such as Twitter, but instead of being centralised it is a federated network which operates in a similar way to email.
Like email, you choose your server and whether it’s GMail, Outlook, iCloud, wherever you sign up you know you’ll be able to email everyone you need to so long as you know their address.
The word “instance” is often used on Mastodon as a synonym of server.
This means there’s no big uncaring company running it all, no shareholders, no central control, none of the targeted advertising we’re all fed up with, just a bunch of people sharing the things they want to share with each other.
(from https://blog.joinmastodon.org/2018/08/mastodon-quick-start-guide/)
What is this Guide?
This Guide will create a Mastodon instance on an Ubuntu 16.04 Server managed by Plesk Onyx.
If your Server is running an other linux distribution managed by Plesk, you can also use this guide for setting up your own instance.
I will use a subdomain in this example, but you can use what ever you want.
Requirements:
- root-access via ssh
- Docker extension installed and enabled in Plesk
- docker-compose installed
- an email-Account to send notifications from your Instance
Use the commandline
These steps you have to do as root on your Plesk-Server.
Install docker-compose
Always check the latest release of docker-compose on Github before you run the commands.
If you did not install docker-compose yet, then you can do this with the following commands:
curl -L https://github.com/docker/compose/releases/download/1.24.1/docker-compose-`uname -s`-`uname -m` -o /usr/local/bin/docker-compose
chmod +x /usr/local/bin/docker-compose
Download Mastodon
Clone the Mastodon Repository into local directory
cd ~/
git clone https://github.com/tootsuite/mastodon
cd mastodon
Change exposed ports
1. Because the future version of Plesk (Obsidian) will have the option to install Grafana as an extension (for Advanced Monitoring) and Grafana uses the port 3000, we are avoiding a port conflict in this guide. That’s why we do not publish the port 3000 and 4000 and we customize in docker-compose.yml. I use the ports 3005 and 4005.
2. We will use the prebuilded Images of Mastodon, so we comment build step in docker-compose.yml.
3. We will define the the tag for the prebuild Image (actually v2.9.2 -> Check latest Version here)
So open docker-compose.yml in a Text-Editor:
nano docker-compose.yml
and edit the port-entries, comment the build step and define the tag for Images:
web:
#    build: .
    image: tootsuite/mastodon
    restart: always
    env_file: .env.production
    command: bash -c "rm -f /mastodon/tmp/pids/server.pid; bundle exec rails s -p 3000"
    networks:
      - external_network
      - internal_network
    healthcheck:
      test: ["CMD-SHELL", "wget -q --spider --header 'x-forwarded-proto: https' --proxy=off localhost:3000/api/v1/instance || exit 1"]
    ports:
      - "127.0.0.1:3005:3000"
    depends_on:
      - db
      - redis
#      - es
    volumes:
      - ./public/system:/mastodon/public/system

  streaming:
#    build: .
    image: tootsuite/mastodon
    restart: always
    env_file: .env.production
    command: node ./streaming
    networks:
      - external_network
      - internal_network
    healthcheck:
      test: ["CMD-SHELL", "wget -q --spider --header 'x-forwarded-proto: https' --proxy=off localhost:4000/api/v1/streaming/health || exit 1"]
    ports:
      - "127.0.0.1:4005:4000"
    depends_on:
      - db
      - redis

  sidekiq:
#    build: .
    image: tootsuite/mastodon
    restart: always
    env_file: .env.production
    command: bundle exec sidekiq
    depends_on:
      - db
      - redis
    networks:
      - external_network
      - internal_network
    volumes:
      - ./public/system:/mastodon/public/system
Create configuration file
Mastodon uses the file .env.production for configuration. The file exists as .env.production.sample, but we create a new one:
nano .env.production
copy, paste and change all domain-entries to the one you use:
LOCAL_DOMAIN=social.your-domain.tld
SINGLE_USER_MODE=false
SECRET_KEY_BASE=
OTP_SECRET=

# Database settings
DB_HOST=db
DB_PORT=5432
DB_NAME=postgres
DB_USER=postgres
DB_PASS=

# Redis settings
REDIS_HOST=redis
REDIS_PORT=6379
REDIS_PASSWORD=

# Mail settings -
SMTP_SERVER=your_mail_server
SMTP_PORT=587
SMTP_LOGIN=notifications@your-domain.tld
SMTP_PASSWORD=your_smtp_password
SMTP_AUTH_METHOD=plain
SMTP_OPENSSL_VERIFY_MODE=none
SMTP_FROM_ADDRESS=Mastodon <notifications@your-domain.tld>
Close file and create the secrets:
1. SECRET_KEY_BASE:
sed -i "s/SECRET_KEY_BASE=$/&$(docker-compose run --rm web bundle exec rake secret)/" .env.production
2. OTP_SECRET:
sed -i "s/OTP_SECRET=$/&$(docker-compose run --rm web bundle exec rake secret)/" .env.production
3. vapid keys
docker-compose run --rm web bundle exec rake mastodon:webpush:generate_vapid_key
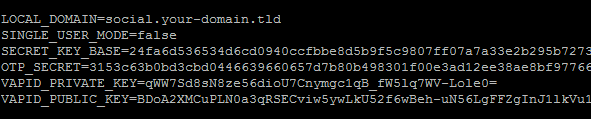
Copy the output from the previous command, open .env.production in a text editor, and paste the command output in the lines after OTP_SECRET.
It should look like this:
Change owner of Mastodon-Content:
The Mastodon-User in docker will use the UID 991, so we have to change the owner of the directory public to this:
sudo chown -R 991:991 public
Setup the database:
With the following command, the database will initialized:
docker-compose run --rm web bundle exec rake db:migrate
Pre-compile assets
Pre-compiling is not nessesary because we use prebuilded images of Mastodon, but you can check the pre-compile with:
docker-compose run --rm web bundle exec rake assets:precompile
Output:
Start Mastodon-Instance
We use docker-compose to bring up the Instance:
docker-compose up -d
Check with docker ps if containers are running and healthy:

Create Admin:
Now we will create the Admin of the Instance:
docker-compose run --rm web tootctl accounts create your-username --email your-email-address --confirmed --role admin
The password is displayed as output on the console, copy this for later use.
If you do not have Plesk as Admin-Panel, you can follow the Mastodon Production Guide to point nginx to your instance.
If you have Plesk then go ahead.
Use Plesk
For these Steps you have to use the Plesk Administration Panel.
Create Subdomain
If you want to use an empty domain, you can skip this step. Otherwise create a subdomain in Plesk and secure it with LetsEncrypt:
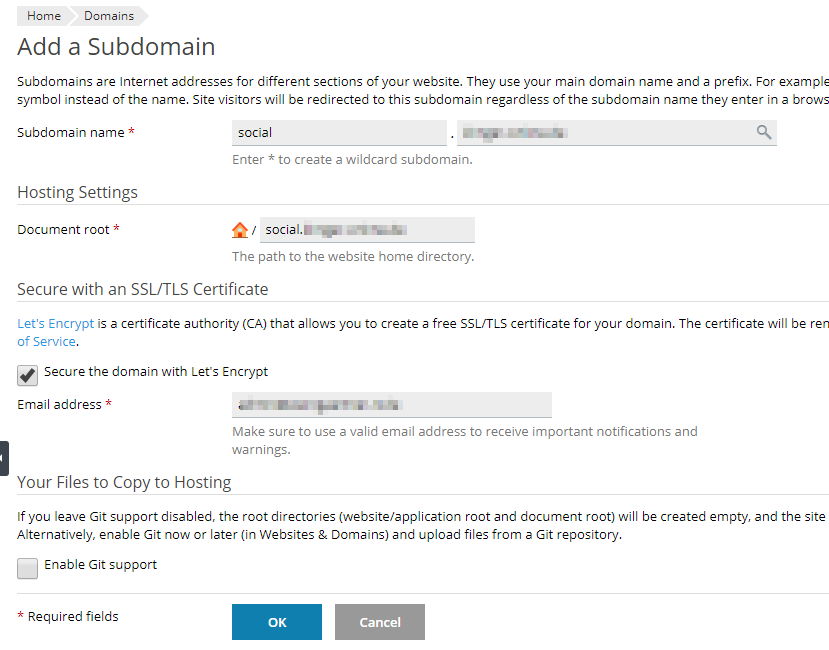
Press OK
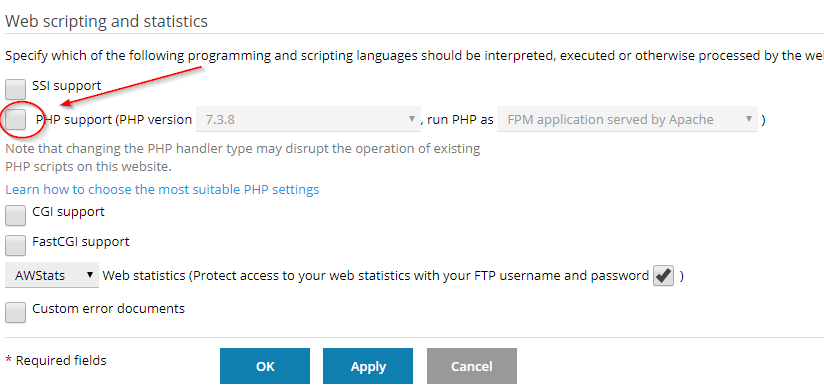
Check Hosting Settings
Check if php-handler is disabled in Hosting Settings:
Delete Webspace-Content
Then use the File Manager to delete the following Content of your Webspace:

Apache & nginx Setting
Disable Proxy Mode in Apache & nginx Settings of your domain:

It is very important to press Apply before you add the following content into Additional nginx directives. If you do not apply you will get an error of duplicate entry for location / and nginx will not start.
So, apply and then add this content (adjust ports, if you use other then 3005/4005):
ssl_protocols TLSv1.2;
ssl_ciphers HIGH:!MEDIUM:!LOW:!aNULL:!NULL:!SHA;
ssl_prefer_server_ciphers on;
ssl_session_cache shared:SSL:10m;

keepalive_timeout    70;
sendfile             on;

gzip on;
gzip_disable "msie6";
gzip_vary on;
gzip_proxied any;
gzip_comp_level 6;
gzip_buffers 16 8k;
gzip_http_version 1.1;
gzip_types text/plain text/css application/json application/javascript text/xml application/xml application/xml+rss text/javascript;

add_header Strict-Transport-Security "max-age=31536000";

location / {
	try_files $uri @proxy;
}

location ~ ^/(emoji|packs) {
	add_header Cache-Control "public, max-age=31536000, immutable";
	try_files $uri @proxy;
}

location /sw.js {
	add_header Cache-Control "public, max-age=0";
	try_files $uri @proxy;
}

location @proxy {
	proxy_set_header Host $host;
	proxy_set_header X-Real-IP $remote_addr;
	proxy_set_header X-Forwarded-For $proxy_add_x_forwarded_for;
	proxy_set_header X-Forwarded-Proto https;
	proxy_set_header Proxy "";
	proxy_pass_header Server;

	proxy_pass http://127.0.0.1:3005;
	proxy_buffering off;
	proxy_redirect off;
	proxy_http_version 1.1;
	proxy_set_header Upgrade $http_upgrade;
	proxy_set_header Connection "upgrade";
	tcp_nodelay on;
}

location /api/v1/streaming {
	proxy_set_header Host $host;
	proxy_set_header X-Real-IP $remote_addr;
	proxy_set_header X-Forwarded-For $proxy_add_x_forwarded_for;
	proxy_set_header X-Forwarded-Proto https;
	proxy_set_header Proxy "";

	proxy_pass http://127.0.0.1:4005;
	proxy_buffering off;
	proxy_redirect off;
	proxy_http_version 1.1;
	proxy_set_header Upgrade $http_upgrade;
	proxy_set_header Connection "upgrade";

	tcp_nodelay on;
}

error_page 500 501 502 503 504 /500.html;
And press OK to accept the settings.
Login as Admin
Point to your domain/subdomain with a browser of your choice and login to your instance with admin-user and password copied before.

If you liked the guide, then share it or support me.
If you want to try Mastodon without setting up an instance, just register to one of my two instances. You can always move your account to another server.
If you want to run your own fully managed Instance hosted in Germany with 100% green Energy, look here
My running Mastodon Instances
Support me:
Thx and feel free to contact me 🙂
———–
Sources:
https://docs.joinmastodon.orgMore information about Mastodon: