How to install Nextcloud Hub 22 on Ubuntu 20.04 with postgreSQL 13 php8.0-fpm Apache2 and HTTP/2
Veröffentlichungsdatum:
Autor: Markus Weingärtner
Schlagwörter: apache2, collaboration, nextcloud, Nextcloud Hub 22, nextcloudhub, php8.0, postgreSQL, Reverse Proxy, ubuntu20, VPS

Nextcloud Hub 22 was released and we want to install it on a new clean VPS
If you want to know what has changed, read the ChangeLog
You can find a detailed overview of Nextcloud Hub 22 here.
If you are ready, then let us begin
Requirements:
– a VPS with Ubuntu 20.04 LTS minimal Image installed (you can get one here @netcup with 5€ Discount or start at Hetzner Cloud with 20€ start credits)
– shell access and appropriate rights
– One DNS A and possibly AAAA record for our Apache vhost
Step 1: Install Firewall
First of all, you should install a firewall to secure your VPS (if not installed) and allow incoming traffic to port 80/443 and 22 (ssh) only. For Securing ssh-access you can use fail2ban and passwordless authentication. Many guides for this are out there.
 and enter the corresponding data, as
  In the basic settings, we customize the background tasks and use
  and configure the user’s cron job accordingly
apt install ufw -y
ufw allow http
ufw allow https
ufw allow ssh
ufw enable
Accept with „y“ Step 2: Install postgreSQL 13 First, we have to add the official postgreSQL-Repository
echo "deb [arch=amd64] http://apt.postgresql.org/pub/repos/apt/ `lsb_release -cs`-pgdg main" |sudo tee /etc/apt/sources.list.d/pgdg.list
wget --quiet -O - https://www.postgresql.org/media/keys/ACCC4CF8.asc | apt-key add -
apt update
After this we can install the postgreSQL as Database-Server:
apt install -y postgresql-13 postgresql-client-13Now you can connect to postgreSQL with:
root@db01:/# sudo -u postgres psql
psql (13.2 (Ubuntu 13.2-1.pgdg20.04+1))
Type "help" for help.

postgres=#
you can get information about connection with:
postgres=#  \conninfo
You are connected to database "postgres" as user "postgres" via socket in "/var/run/postgresql" at port "5432".
and end session with:
postgres-# \qStep 3: Install Apache2 With the following command we will install the Apache-Webserver:
apt install -y apache2 apache2-utilsStep 4: Install php8.0-fpm an recommended moduls the php8.0 packages are not in offical repository of Ubuntu 20, so you have to add ondrej’s ppa:
echo "deb http://ppa.launchpad.net/ondrej/php/ubuntu $(lsb_release -cs) main" | tee /etc/apt/sources.list.d/php.listand add the key:
apt-key adv --recv-keys --keyserver hkps://keyserver.ubuntu.com:443 4F4EA0AAE5267A6CNow you can install php8.0 and moduls with the following command:
apt update && apt install -y php8.0-cli php8.0-common php8.0-mbstring php8.0-gd php8.0-imagick php8.0-intl php8.0-bz2 php8.0-xml php8.0-pgsql php8.0-zip php8.0-dev php8.0-curl php8.0-fpm redis-server php8.0-redis php8.0-smbclient php8.0-ldap php8.0-bcmath php8.0-gmp libmagickcore-6.q16-6-extraStep 5: Configure Apache2 and php8.0-fpm Now we enable the needed modules in Apache2 with:
a2enmod proxy_fcgi setenvif mpm_event rewrite headers env dir mime ssl http2and after that we activate
php8.0-fpm:
a2enconf php8.0-fpmnow we have edit the
apache2.conf to allow the usage of .htaccess-files:
nano /etc/apache2/apache2.confand change the following code:
<Directory /var/www/>
Options Indexes FollowSymLinks
AllowOverride None
Require all granted
</Directory>
to:
<Directory /var/www/>
Options Indexes FollowSymLinks
AllowOverride All
Require all granted
</Directory>
To enable HTTP/2, we need to add this line to apache2.conf:
Protocols h2 h2c http/1.1now we have to prepare the
php.ini for nextcloud:
nano /etc/php/8.0/fpm/php.iniextend with the following directives:
opcache.enable=1
opcache.enable_cli=1
opcache.interned_strings_buffer=8
opcache.max_accelerated_files=10000
opcache.memory_consumption=128
opcache.save_comments=1
opcache.revalidate_freq=1
and adjust the following Lines:
max_execution_time = 300
max_input_time = 600
memory_limit = 512M
upload_max_filesize = 10240M
Afterwards, the
web server and php8.0-fpm must be restarted:
systemctl restart apache2 php8.0-fpmStep 6: Install Certbot and other tools To request a ssl-sert from LetsEncrypt we use
Certbot and the apache-plugin:
apt install -y python3-certbot-apache certbot wget curl sudo unzipStep 7: Create Database Before we can install Nextcloud, we first have to create a database in postgreSQL. To do this, we execute the following commands:
sudo -u postgres psqlthen execute:
CREATE USER nextcloud WITH PASSWORD 'your-password';
CREATE DATABASE nextclouddb TEMPLATE template0 ENCODING 'UNICODE';
ALTER DATABASE nextclouddb OWNER TO nextcloud;
GRANT ALL PRIVILEGES ON DATABASE nextclouddb TO nextcloud;
\q
Step 8: Download Nextcloud and create filesystem Now it’s time to download the latest Release of Nextcloud Hub from nextcloud:
wget https://download.nextcloud.com/server/releases/latest-22.zipand unzip the downloaded archive:
unzip latest-22.zipAfterwards we move the folder
nextcloud to the right place.
we move the entire folder into the path /var/www/html/
mv nextcloud /var/www/html/
chown -R www-data:www-data /var/www/html/nextcloud
You can delete the downloaded archive now:
rm latest-22.zipFor our nextcloud-files we prepare a directory outside of
/var/www/html/nextcloud:
mkdir /nextcloud_dataand change the owner to
www-data:
chown -R www-data:www-data /nextcloud_dataThe document-root for Apache is now /var/www/html/nextcloud Step 9: Create Apache2 vHost and secure with SSL To create an Apache vhost, we simply create a new
.conf in /etc/apache2/sites-available/:
nano /etc/apache2/sites-available/001-nextcloud.confadd the following content and adjust your names:
<VirtualHost *:80>
ServerName nextcloud.your-domain.tld
ServerAdmin webmaster@your-domain.tld
DocumentRoot /var/www/html/nextcloud

ErrorLog ${APACHE_LOG_DIR}/error.log
CustomLog ${APACHE_LOG_DIR}/access.log combined
</VirtualHost>
then we activate this site and disable the default vHost:
a2ensite 001-nextcloud.conf
a2dissite 000-default.conf
systemctl reload apache2
Since we want to reach the site of course via https, we create a LetEncrypt certificate. The easiest way to do this is with Certbot, which we already installed above:
certbot --apache --rsa-key-size 4096In the last query, we confirm with „2“ that a redirect should occur. Certbot then creates a second vhost configuration file, which we then process again:
nano /etc/apache2/sites-available/001-nextcloud-le-ssl.confwe add the following block under
DocumentRoot-directive:
<IfModule mod_headers.c>
Header always set Strict-Transport-Security "max-age=15768000; preload"
Header always set Referrer-Policy "strict-origin-when-cross-origin"
# Prevent MIME based attacks
Header always set X-Content-Type-Options "nosniff"
Header always set X-Frame-Options "SAMEORIGIN"
</IfModule>
# SSL Configuration - uses strong cipher list - these might need to be downgraded if you need to support older browsers/devices
SSLEngine on
SSLCipherSuite EECDH+AESGCM:EDH+AESGCM:AES256+EECDH:AES256+EDH
SSLProtocol All -SSLv2 -SSLv3 -TLSv1 -TLSv1.1
SSLHonorCipherOrder On

<Directory /var/www/html/nextcloud/>
Require all granted
AllowOverride All
Options FollowSymLinks MultiViews

<IfModule mod_dav.c>
Dav off
</IfModule>

SetEnv HOME /var/www/html/nextcloud
SetEnv HTTP_HOME /var/www/html/nextcloud
Satisfy Any

</Directory>
then we have to reload the webserver again:
systemctl reload apache2Step 10: Configure Nextcloud For final configuration, we call our domain in the browser:
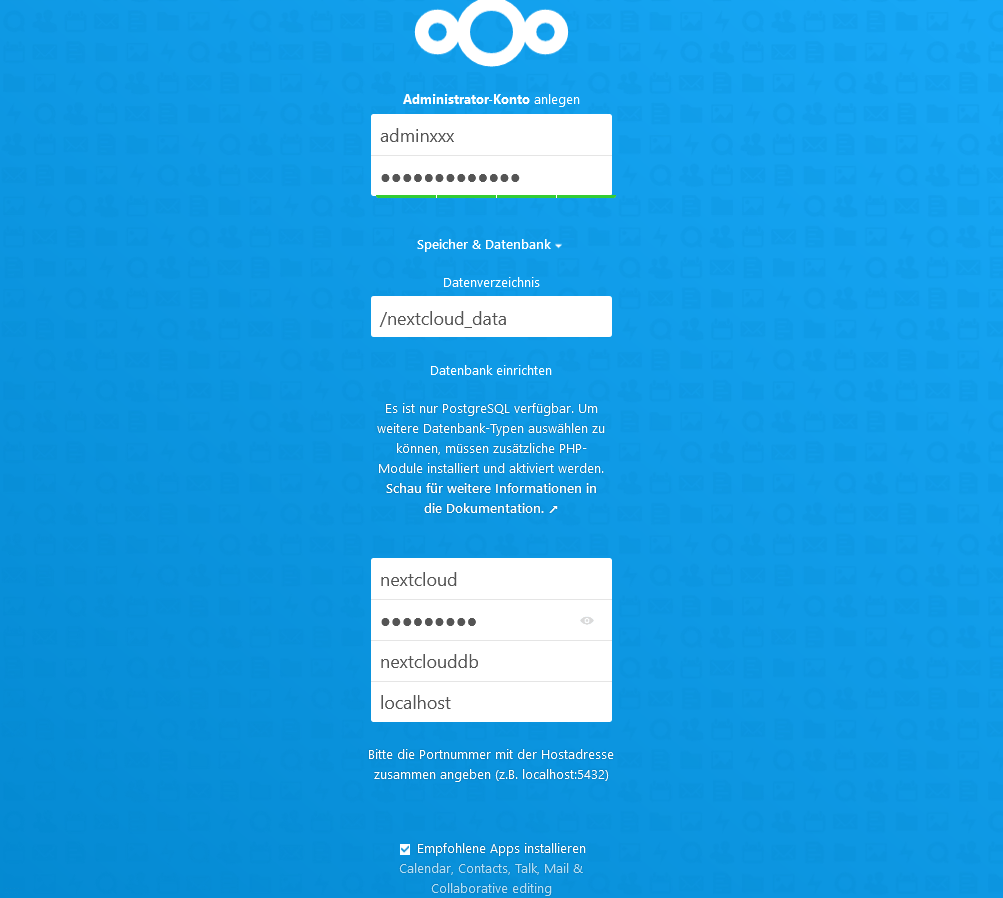
and enter the corresponding data, as DB host we enter localhost and the data directory is /nextcloud_data.
You have to finish the Installation with the Button at the botton.
Now wait some time until all Apps have been installed
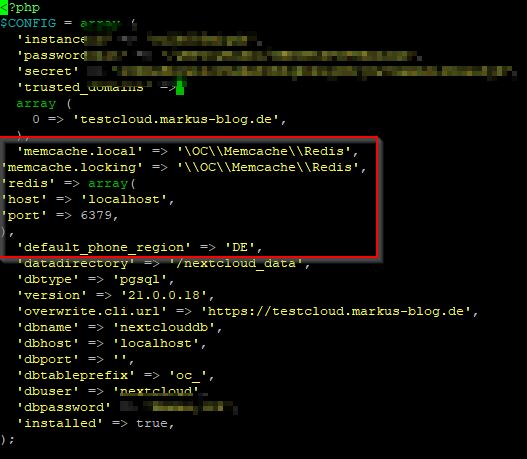
When finished, let’s take Nextcloud’s config.php to configure the recommended memory cache and setting default phone region:
nano /var/www/html/nextcloud/config/config.phpadd the following code:
'memcache.local' => '\OC\\Memcache\\Redis',
'memcache.locking' => '\\OC\\Memcache\\Redis',
'redis' => array(
'host' => 'localhost',
'port' => 6379,
),
'default_phone_region' => 'DE',
It looks like this:
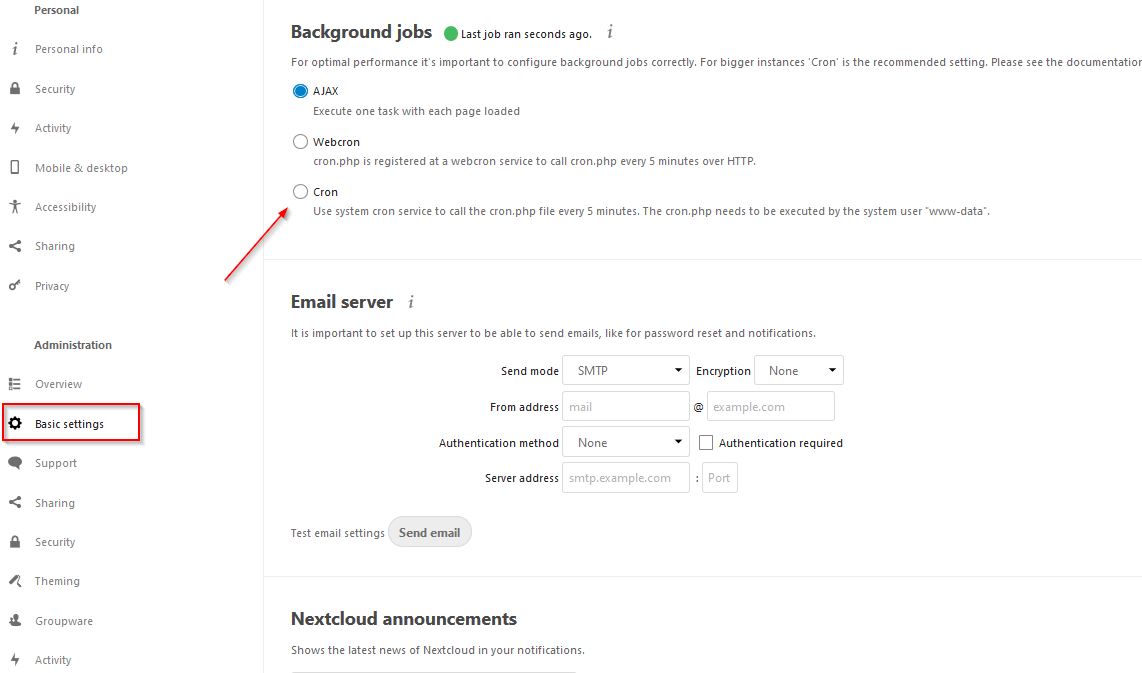
In the basic settings, we customize the background tasks and use cron:
and configure the user’s cron job accordingly www-data(adjust path and/or user if you use another one):
sudo crontab -u www-data -eadd the following line at the end:
*/5 * * * * php8.0 -f /var/www/html/nextcloud/cron.phpRestart Apache2 and php-fpm:
systemctl restart apache2 && sudo systemctl restart php8.0-fpmthen refresh your browser and Check the Security and Setup Warnings in Settings Overview. Do not forget to configure your mail-settings Now we have a freshly installed NextcloudHub and can enjoy… Remember: If you find issues within the Nextcloud, then report here on GitHub. Problems with the tutorial? Then comment below or contact me per Mail or Mastodon. If you want a managed nextcloud, then look here. I will be happy if you would support my work here. Happy nextclouding and do not forget to share 🙂
Beitragsbild mit freundlicher Genehmigung von Marcus Günther. http://guenique-photography.de
